Messaging
Iridium Burst
What Iridium Burst allows
Iridium Burst is a one-way satellite broadcast module. Instead of addressing one asset at a time, you pick a geographic area, type a short message, and the portal pushes that single message to every Burst-capable receiver inside the targeted area over the Iridium network — anywhere on the planet, in near-real-time.
In practice you get:
- One-to-many area broadcasts. One operator, one message, thousands of receivers. No per-device pairing and no recipient lists to maintain.
- Three ways to define the target area — a saved Zone, one or more Broadcast Coverage Area (BCA) codes, or a Circle drawn on the map.
- Flexible timing — send now, after a delay, or scheduled for a future time, with optional repeats and an auto-expiry window.
- A full message history — every broadcast is logged with its target, status, and delivery progress, and in-progress broadcasts can be cancelled.
Typical users are Maritime fleets (weather and safety notices to every hull in a region), Government and Emergency Response teams (area-wide advisories and evacuation orders), Aerospace operators (safety notices to airframes in a sector), and Enterprise field teams in Energy, Mining, and Forestry operating where cellular coverage does not reach.
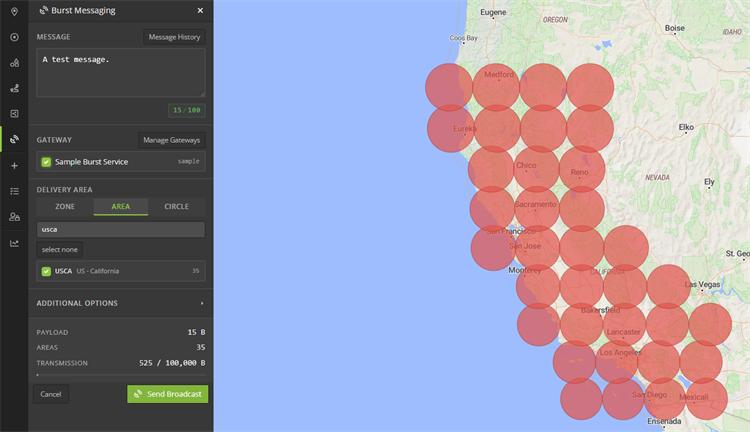
Figure 1 — The Burst Messaging panel and its map coverage preview.
Before you can use it
The Burst Messaging button only appears in the side navigation when all three of the following are true for your account:
- The Burst Messaging feature is enabled on your client's subscription.
- Your client has at least one Iridium Burst gateway account configured (see Enabling the feature below).
- You are an administrator, or an administrator has granted you the Can send Iridium Burst messages permission.
If any one of these is missing, the panel stays hidden. Removing the last Burst gateway from a client hides the panel again without changing the subscription flag.
Enabling the feature: create an Iridium Burst gateway account
The feature becomes reachable for your users the moment the first Iridium Burst gateway account exists. Creating one is a one-time, administrator-only step that stores the Iridium Data Provider (DP) credentials the portal uses to authenticate every broadcast — so operators never type credentials into the Send form.
Step 1 — Open the Gateway Accounts list
From the portal, go to Manage › Gateway Accounts, then click Create Gateway Account. (You can also reach this list from the Manage gateways link in the Burst panel's Gateway section.)

Figure 2 — Gateway Accounts list. Click Create Gateway Account to add a Burst gateway.
Step 2 — Choose the Iridium Burst account type
On the Create Gateway Account form, set Account Type to Iridium Burst. Selecting this type reveals the Burst-specific fields and relabels the credential fields to match Iridium's DP terminology.

Figure 3 — The Create Gateway Account form configured for Iridium Burst.
Step 3 — Fill in the DP credentials
When Iridium Burst is selected, the form shows these fields:
| Field | What to enter | Required |
|---|---|---|
| Service Name | The broadcast service_name for your closed user group — this identifies the group of subscribed devices that should receive the broadcast. | Yes |
| DP Username | Your Iridium GBTC DP username. | Yes |
| DP Password | Your Iridium GBTC DP password. | Yes |
| DP Domain | The GBTC domain. This is pre-filled with the portal default; leave it as-is unless Iridium gave you a specific domain. | Optional |
| Description | A friendly label for this gateway (e.g. "Coastal Advisories" or "Emergency Channel"). This is the name operators see in the Send panel's gateway picker, so make it recognizable. | Recommended |
Click Create Gateway Account to save.
Multiple gateways
A client can have several Iridium Burst gateways (for example, separate DP identities for routine and emergency channels). The Send panel lets an operator pick one or more gateways per broadcast, so give each a clear Description.
Step 4 — Confirm the panel is now available
After the first Burst gateway is saved, the Burst Messaging button — a satellite-dish icon — appears in the side navigation for administrators and for any user granted the Can send Iridium Burst messages permission (set per user under Manage › Users). Clicking it opens the Send Message panel.
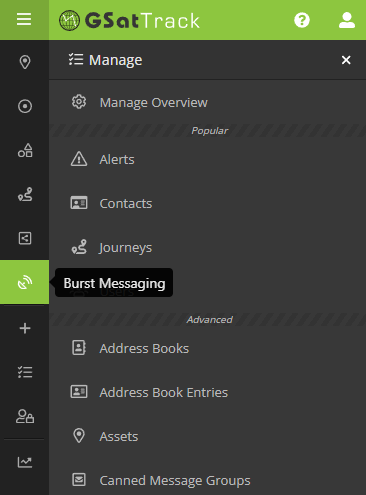
Figure 4 — The Burst Messaging button in the side navigation.
Using the messaging component
Open the Burst Messaging panel from the side navigation. The panel is laid out top-to-bottom in the order you fill it in:
- Message — what you're broadcasting.
- Gateway — which Burst gateway(s) carry it.
- Delivery Area — where it goes (the three targeting methods).
- Additional Options — when it goes and how it behaves (collapsible).
- Transmission summary — live payload, coverage, and size readout.
- Send Message — submit.
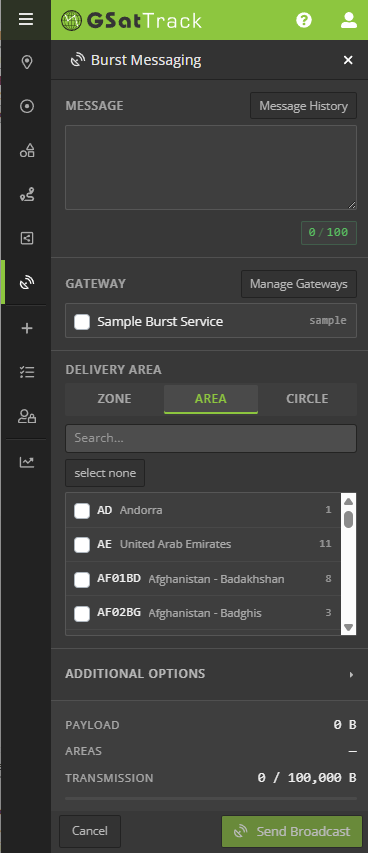
Figure 5 — Anatomy of the Send Message panel.
Compose the message
Type your broadcast into the Message box. Two limits apply and are enforced as you type:
- 100 characters maximum. A live counter (e.g.
42 / 100) shows your length and turns amber as you approach the limit, red if you exceed it. - Printable ASCII only. Standard letters, numbers, and punctuation are allowed. Non-ASCII characters (accented letters, emoji, curly quotes) are blocked on typing and on paste, so the broadcast cannot carry an unsupported character.
Pick the gateway(s)
In the Gateway section, tick one or more Iridium Burst gateways. The list shows each gateway's Description and DP username. Selecting more than one fans the same broadcast out through each gateway in a single submit; the history log then shows one row per gateway.
The three ways to send a message (Delivery Area)
Every broadcast must target an area. The Delivery Area section offers three tabs — Zone, BCA, and Circle — and you use exactly one per send. Whichever you pick, the portal resolves your choice to a concrete set of coverage cells (GDAs) and lights them up on the map so you can confirm the footprint before sending.
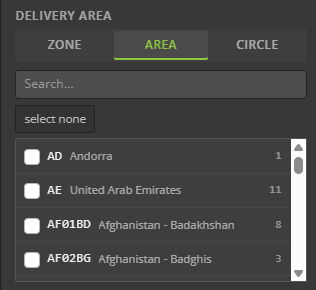
Figure 6 — The three Delivery Area tabs.
Method 1 — Zone (a saved area)
A Zone is a named, pre-built area that an administrator has curated for areas you broadcast to repeatedly — a sector, a coastline, a patrol block, a fleet boundary.
- On the Zone tab, optionally type in the filter box to narrow the list.
- Tick the Zone you want. The map highlights its coverage and the transmission summary updates.
Administrators get a Manage Zones button here to create, rename, or edit Zones; other Burst users can select existing Zones but not change them. Zones are the fastest option for routine, repeated broadcasts because the area is already defined.
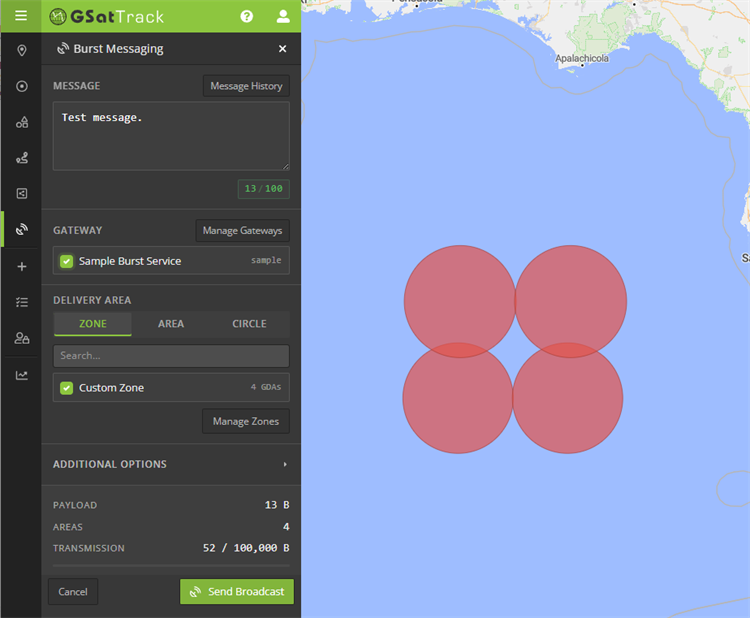
Figure 7 — Targeting a saved Zone.
Method 2 — BCA (Broadcast Coverage Area codes)
A BCA is one of Iridium's published regional coverage codes — useful when your target lines up with a country, province, or other registered region.
- On the BCA tab, use the filter box to search by code or name.
- Tick one or more codes. (Select None clears your picks.) The map shows the combined coverage of everything you've selected.
Use BCAs when a published regional code already matches the area you want to reach.
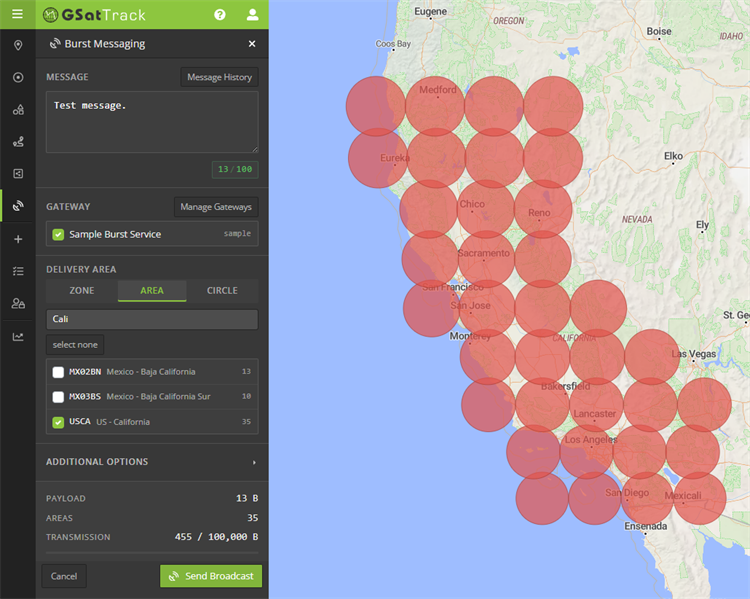
Figure 8 — Targeting one or more BCA codes.
Method 3 — Circle (a point and radius)
A Circle is an ad-hoc area for one-off events — a search radius, a storm front, an incident perimeter — where neither a Zone nor a BCA fits.
- On the Circle tab, enter a Latitude, Longitude, and Radius (km). The radius defaults to 150 km.
- Or click Pick on Map: the cursor becomes a crosshair, and your next click on the map sets the circle's center. Then set the radius.
The map draws the circle and highlights the coverage cells whose centers fall inside it, and the transmission summary updates live.
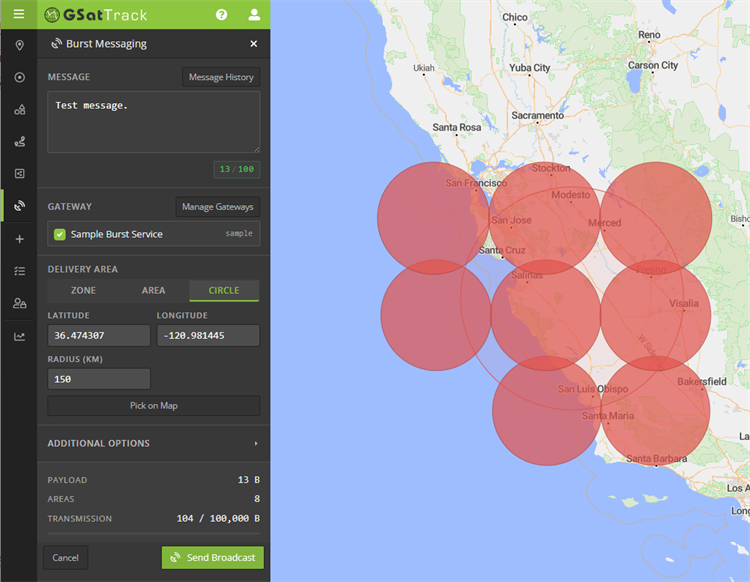
Figure 9 — Targeting an ad-hoc Circle.
Reading the transmission summary
Below the options, a live transmission summary keeps you inside Iridium's limits as you build the broadcast:
- Payload — the size of your message in bytes.
- Coverage — the number of coverage cells (GDAs) your target resolves to.
- Transmission size — payload × coverage, shown against the 100,000-byte cap, with a progress bar that warns as you approach the limit and blocks the send if you exceed it.
The Send Message button stays disabled until the message, a gateway, and a valid target are all set and the transmission size is within the cap.
Figure 10 — The live transmission summary.
Sending
When everything is valid, click Send Message. The portal validates the request, resolves the target, and dispatches the broadcast through each selected gateway. A status banner confirms success or reports any per-gateway error, and the message box clears on a fully successful send. Cancel resets the form without sending.
Note
A successful submit means Iridium accepted the broadcast for transmission — it is not yet a delivery confirmation. Track the outcome in Reviewing message history below.
Advanced options (Additional Options)
Click Additional Options to expand the advanced settings. Everything here is optional; a broadcast with the section collapsed simply sends immediately, once.
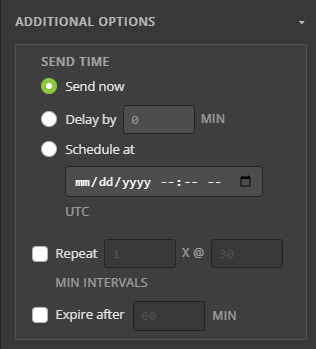
Figure 11 — The Additional Options section.
- Timing — choose one:
- Send now (default) — transmit as soon as the broadcast is accepted.
- Delayed — wait a set number of minutes before sending.
- Scheduled — send at a specific UTC date and time. Times are entered and interpreted in UTC. Delayed and Scheduled sends can be set up to roughly 8 days (192 hours) ahead.
- Repeat — tick to retransmit the broadcast. Set the count (how many additional transmissions) and the interval in minutes between them. Use this for notices that should reach receivers that come online after the first send.
- Expire after — tick to set an auto-expiry window in minutes. Iridium automatically stops any remaining transmissions once the window passes — ideal for time-sensitive advisories that should not keep broadcasting after they are stale.
Reviewing message history
Every broadcast is logged. Open the history from the Message History button in the Message section header (breadcrumb: Burst Messaging › Message History).
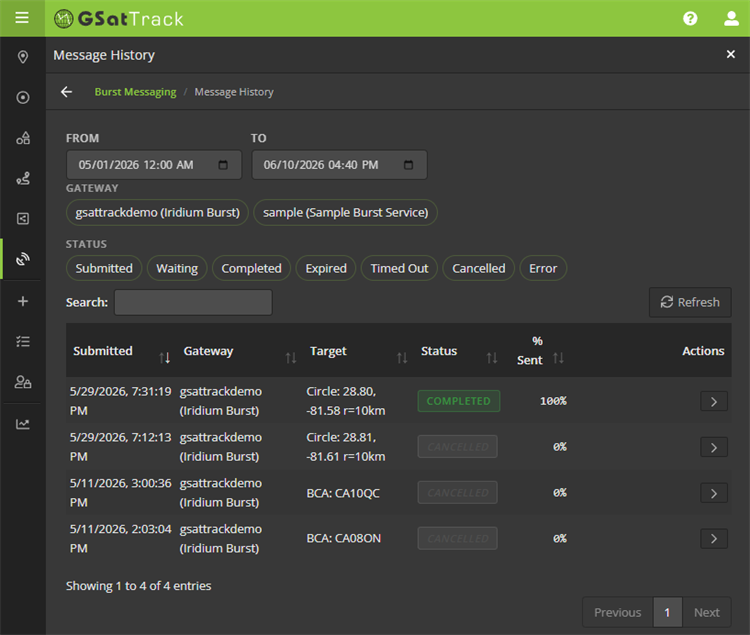
Figure 12 — The Message History panel.
Filtering the list
- Date range — set From and To. The view defaults to the last 7 days. Changing the range reloads the list from the server.
- Gateway pills — click a gateway to show only its broadcasts; click again to clear. Multiple gateways can be active at once.
- Status pills — filter by status: Submitted, Waiting, Completed, Expired, Timed Out, Cancelled, Error.
- Search box — free-text search across the visible rows.
- Refresh — the list does not auto-poll; click Refresh to pull the latest status from the server.
Reading a row
Each row shows Submitted time, Gateway, Target (a short summary such as Zone: #3 (12), BCA: US, CA, or Circle: 40.71, -74.01 r=150km), Status, and % Sent. Columns are sortable and the list is paginated.
The Status values mean:
| Status | Meaning |
|---|---|
| Submitted | The broadcast has been created and handed to Iridium. |
| Waiting | Iridium has acknowledged and queued the broadcast. |
| Completed | The broadcast finished transmitting. |
| Expired | The expiry window was reached before completion. |
| Timed Out | Iridium reported a timeout. |
| Cancelled | An operator cancelled the broadcast. |
| Error | The broadcast failed; see the row's Error detail. |
Inspecting a broadcast
Click a row's expand (chevron) button to open its full detail: the broadcast's identifier, the exact message text, any error, the time mode and scheduled time, queued/completed timestamps, repeat and expiry settings, payload size, and the resolved target detail.
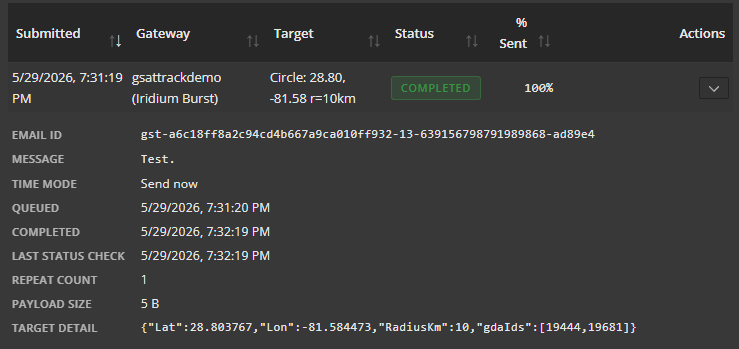
Figure 13 — An expanded broadcast detail row.
Cancelling an in-progress broadcast
Broadcasts that have not yet reached a final state (Submitted or Waiting) show a Cancel button in the row's Actions column. Click it, confirm the prompt, and the portal asks Iridium to stop the broadcast; the row updates to Cancelled on the next load. Broadcasts already in a terminal state (Completed, Expired, Timed Out, Cancelled, Error) cannot be cancelled.
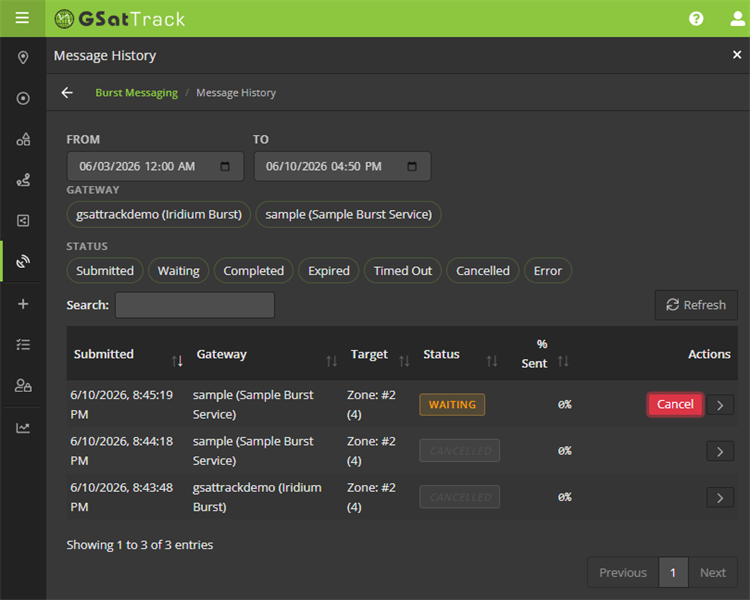
Figure 14 — Cancelling an in-progress broadcast.
Quick reference
- Where to find it: Side navigation → Burst Messaging (satellite-dish icon).
- Prerequisites: Burst Messaging feature enabled + at least one Iridium Burst gateway + administrator (or the Can send Iridium Burst messages permission).
- Enable it: Manage › Gateway Accounts › Create Gateway Account → Account Type Iridium Burst → enter Service Name, DP Username, DP Password (DP Domain pre-fills) → save.
- Three targeting methods: Zone (saved area), BCA (published region codes), Circle (point + radius / pick on map).
- Message limit: 100 printable ASCII characters.
- Transmission cap: 100,000 bytes (payload × coverage cells).
- Timing: Send now / Delayed / Scheduled (UTC), up to ~8 days ahead; optional repeat and auto-expiry.
- History: Message History button → date range, gateway/status filters, row detail, and per-row cancel for in-progress broadcasts.