Communications
Cloud Storage Contacts
What Cloud Storage contacts do
The Cloud Storage contact type lets the portal upload completed Scheduled Reports to a cloud storage provider instead of — or in addition to — emailing them. Today Microsoft Azure Blob Storage is the supported provider; others, such as Google Cloud Storage or Amazon S3, may be added in the future.
Because the destination lives on a Contact, every Scheduled Report already knows how to target it: add the Cloud Storage contact to a report's recipient list exactly as you would an email contact, and each run writes the report file to your container. This is the path you want when reports need to flow into a downstream system — an archive vault, a BI ingestion pipeline, a regulatory submission bucket, or a partner-shared container — rather than an inbox.
Setting one up takes two short tasks: your Azure administrator generates a Shared Access Signature (SAS) URL for the target container, and a portal administrator adds a Cloud Storage contact that holds that URL.
Generate a Blob SAS URL in Azure
Your Microsoft Azure Blob Storage administrator grants the portal access by minting a Shared Access Signature (SAS) for the container that will hold the reports.
Step 1 — Select the container
In the Azure portal, open the Storage account and select the Container you want reports uploaded to.
Step 2 — Open Shared access tokens
Navigate to the container's Settings › Shared access tokens screen to generate a SAS token and URL.
Step 3 — Grant permissions
Grant, at minimum, the Create or Write permission so the portal can upload report files. Grant Delete as well: when you save the contact, the portal writes a small test file to the container and then deletes it to leave the container clean. The test still passes if Delete is withheld, but the test file is left behind.
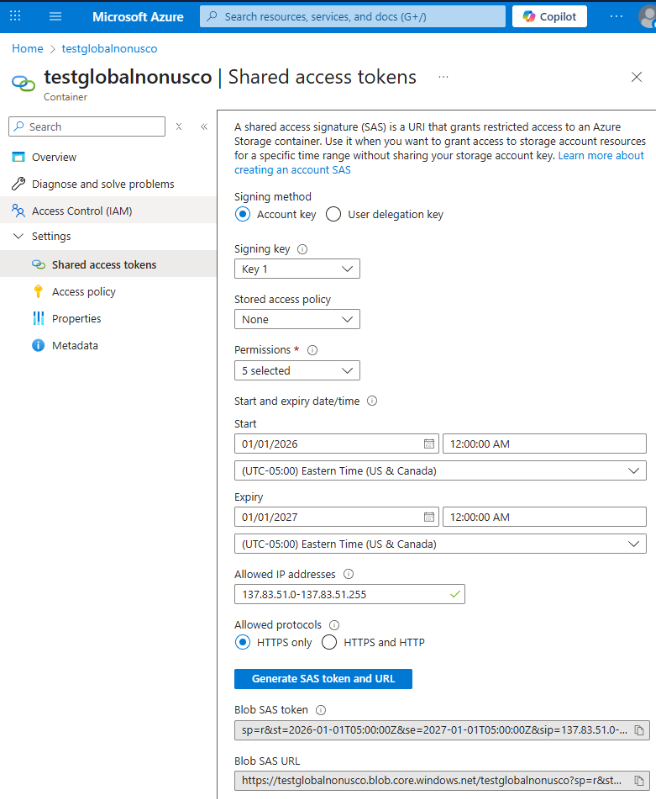
Figure 1 — Generating a SAS token with the required permissions in Azure.
Set an expiry that suits your retention and rotation policy, then generate the token.
Step 4 — Copy the Blob SAS URL
Copy the generated Blob SAS URL. This single URL carries both the container address and the access signature — there are no separate account keys or service principals for the portal to manage. Treat the SAS URL as a secret: anyone holding it has whatever access the token grants, until the token expires.
Add the Cloud Storage contact in the portal
Step 1 — Open the contact form
Go to Manage › Alerts › Contacts, then click Add Contact.
Step 2 — Name the contact and choose the type
- Enter a Name — this is what you'll see in the Scheduled Report recipient list (e.g. "Azure Blob Test").
- Set Type to Cloud Storage. The form reveals the cloud-storage fields. The contact Type is fixed once the contact is created, so if you need a different type later, create a new contact.
Step 3 — Paste the SAS URL and set an optional prefix
- Cloud storage type — leave on Azure Blob Storage (the only provider today).
- Blob SAS Url — paste the URL from the previous section.
- Blob name prefix (optional) — prefix every uploaded file with a path to organize them into a virtual folder inside the container. End the prefix with a backslash, e.g.
myfolder\, to drop reports into a myfolder folder.
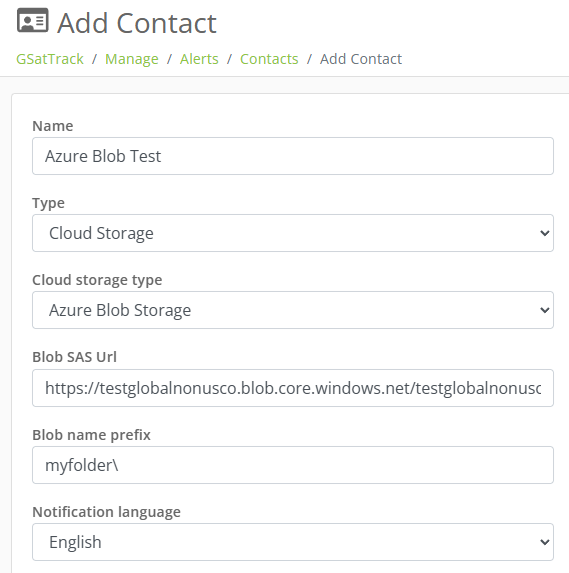
Figure 2 — The completed Cloud Storage contact, with the SAS URL and an optional blob name prefix.
Step 4 — Save and let the portal verify access
Click Create Contact. On save, the portal uploads a small test file to the container to confirm the SAS URL works, then deletes it on success. If the URL is missing, malformed, or lacks write permission, the contact will not save and you'll see "The Cloud Storage account credentials could not be validated." — re-check the SAS URL and its permissions and try again.
After the contact is created, non-administrators who open it see the SAS URL masked; only administrators can view or replace the stored URL.
Attach the contact to a Scheduled Report
A Cloud Storage contact is selectable anywhere a Scheduled Report picks recipients.
- Go to Reports › Scheduled Reports and Create or Edit a scheduled report.
- In the Contacts section, tick your Cloud Storage contact. It appears as Name (Cloud Storage - Azure Blob Storage). The recipient list shows only Email and Cloud Storage contacts.
- Finish configuring the report's type, schedule, and assets, then save.
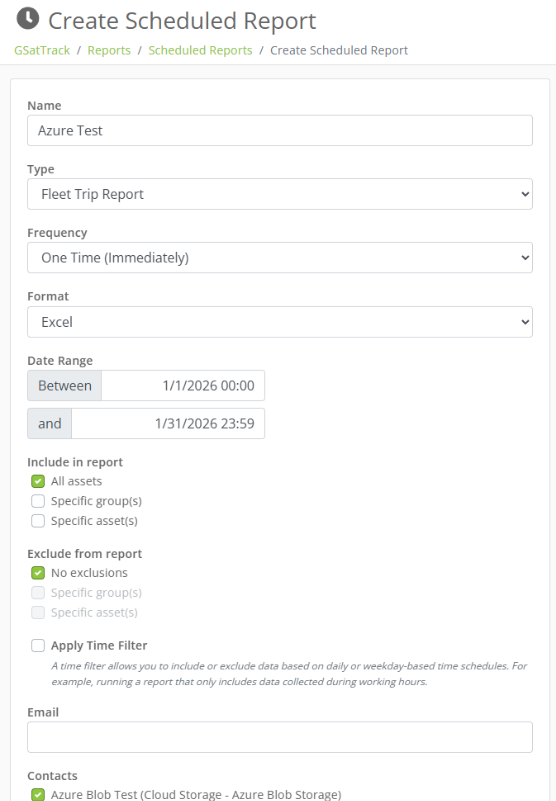
Figure 3 — Choosing the Cloud Storage contact when running a Scheduled Report.
You can tick both an email contact and a Cloud Storage contact on the same report to archive and distribute in a single run.
What gets uploaded, and how it's named
Each time the schedule fires, the portal renders the report and uploads every generated file to the container.
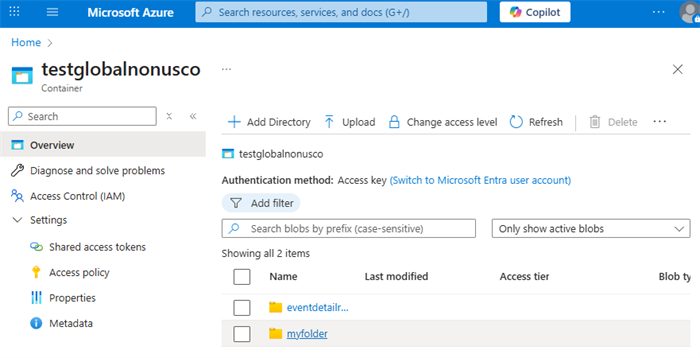
Figure 4 — The blob name prefix nests deliveries into a folder (here, myfolder) inside the container.
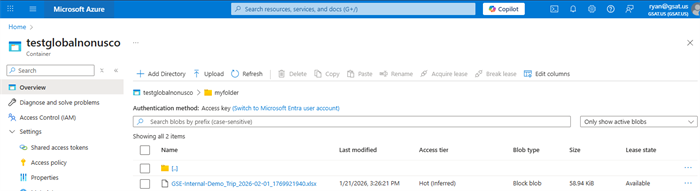
Figure 5 — A completed report uploaded to the storage container.
Uploaded files follow this naming pattern:
{Prefix}{AccountName}_{ReportType}_{Date}_{Epoch}.{Extension}
| Token | Meaning |
|---|---|
| Prefix | Your optional Blob name prefix (e.g. myfolder\), or empty |
| AccountName | Your account name, with spaces replaced by dashes |
| ReportType | The report type (e.g. Trip, Position, Activity) |
| Date | The report's UTC date, formatted yyyy-MM-dd |
| Epoch | Unix timestamp (seconds) of that UTC date |
| Extension | The file extension (e.g. xlsx, pdf, csv) |
Example: myfolder\GSE-Internal-Demo_Trip_2026-02-01_1769921940.xlsx
The Epoch suffix keeps every run's file unique, so successive reports accumulate in the container rather than overwriting one another.
Keeping it working
- Watch the SAS expiry. Uploads stop succeeding once the SAS token expires. Generate a fresh SAS URL in Azure and update the contact's Blob SAS Url before that happens.
- Permissions. The token needs Create/Write for uploads; Delete is only used to clean up the one-time test file written when the contact is saved.
- Rotation. To rotate credentials, edit the contact and paste a new SAS URL — saving re-runs the access test against the new URL.